
Table of Contents:
- Assigning Locker Numbers
- Best Practice for Non-returning Staff Members
- Best Practices for REA ITV College Classes
- Check Your Mailing Street Information
- Entering Historical Grades Earned this Spring
- Field Verification Reports
- Graduating Early (End of Junior Year)
- Lock Reporting Terms
- New Features in PowerTeacher Pro 19.4
- Transfer Student Assignment Scores to a Different Class
- North Dakota Civics Requirements for Graduation
- Resetting Class Counts
- Section Readiness Report
- Using Smart Search
- What is Our District Code for the Mobile App?
- Storm Days
- Manage Profile
- Viewing Student Accommodations
- Finding District Code for the Mobile App
- Wait to Turn on Vertical Reporting
Assigning Locker Numbers
How to assign locker numbers by grade level or for all students:
-
Select the school
-
Select a grade level, or all students
-
Select System Reports under Reports
-
Select the Custom Reports Tab
-
Select the Tab
-
Select the Field Verification Report
-
From the Field Name pull-down menu, select Locker Number, (Can also use this for Locker Combination)
-
From the Students pull-down menu, select All students or your Current Selection
-
Remove the checkmark from pause
-
Enter new locker numbers
-
Submit
Best Practice for Non-returning Staff Members
The following information is considered best practice when working with non-returning staff member PowerSchool accounts. It is easiest to leave the non-returning staff member in PowerSchool until you hire a replacement. When you hire the replacement, and if the schedule is the same, then . . .
Assigning New Teacher to Class Sections
-
At the School Level
-
Under Functions select Teacher Schedules
-
Select Non-Returning Teacher
-
Select Sec# of the section the non-returning teacher was assigned to teach
-
In the area of Teacher – Section Lead, change the staff name to the new teacher
-
Submit (repeat for all sections being taught)
Non-returning Staff Member Status Changed to Inactive
-
At the School level, Select the current Year Term
-
Select Non-Returning Teacher
-
Select Current Schedule
-
No classes should be listed, if classes remain, select any sections listed and move to a new teacher or drop students and then delete the section.
-
To drop students, when at the Current Schedule page, under the Enrollments column, select the number enrolled, select Drop from This Class
-
To delete section, when at the Current Schedule page, select Sec#, scroll to the bottom, Select Delete Section, password = p/s/
-
-
Select Information
-
Staff Type should be changed to Not Assigned
-
Remove the Checkmark from Active
-
Submit
Additional Notes
NEVER delete sections with students enrolled during the school year without first removing student enrollments from that section. Failure to do so can result in orphaned attendance and CC records, thus causing a multitude of problems within your site.
When you make the non-returning staff member inactive, the following day their K12 email address will also be inactive. Make sure the non-returning staff member is aware that this will happen.
Best Practices for REA ITV College Classes
Schools offer courses from colleges, ITV consortiums, REA’s, and the ND Center for Distance Ed (NDCDE). MISO3 reporting of classroom teachers out of PowerSchool has raised the question, “To avoid errors, who should be listed as the classroom teacher?”
Best practice for classes offered by a REA and ITV consortium.
Best practice is to have the remote classroom teacher recorded as the teacher of the class at the local school. The teacher license number will be entered, and the salary will be left blank. The teacher’s username will be the teacher’s last name. Remote teachers will all use the same password. These teachers will be scheduled to teach their classes using the correct course code and students will be enrolled.
Best practice for classes offered by a college or university.
Best is to have the classroom teacher recorded as the teacher for the class. The teacher license number will be entered. If they don’t have a license number, leave it blank. The salary will be left blank. The teacher’s username will be the teachers last name. Remote teachers will all have the same password. These teachers will be scheduled to teach their classes using the correct course code and students will be enrolled.
At the end of the term, the local school will receive the grades from the REA, ITV consortium college, or university. The administrative assistant or principal will log into each teacher’s PT Pro account and enter a final grade.
You will want to add one more step for Dual Credit Courses. You should log into eTranscript and select “Maintain Dual Credit Mapping”. If the college course is mapped to the high school course, great! Nothing else needs to be done. If it isn’t, this course should be mapped. If you need help mapping this class, please submit a ticket to the Help Desk and we can help you.
Best practice for classes offered by a ND Center for Distance Ed (NDCDE).
When students take classes from the NDCDE, the course credit is being awarded by the NDCDE. Therefore, it is incorrect to award credit from the local school. These grades need to be entered individually, for each student, into historical grades. The student’s transcript should show that this credit was earned from the NDCDE.
Schools only need a placeholder for the class, a place for them to take attendance. This can be a study hall or some other non-instructional course.
Adding a New REA, ITV, or College Teacher
-
New Staff Entry
-
Enter all required info, and any other pertinent info you may have. For the ID field, you must enter a unique ID. Do Not enter a social security number. Best practice is to use the first initial of first and last name and then four random numbers.
-
Submit
-
Go back to the Start page
-
Click on the Staff tab, select Teachers
-
Search for and select the new staff member
-
Select Security Setting
-
Since the teachers will be teaching a class, they will need access to PowerTeacher as well. Check the box to Sign in to PowerTeacher. Enter a username (Teachers last name) and a password.
-
Add the schools this individual is required to work with by selecting the Add button and selecting the schools from the list.
-
Click OK and Submit
-
Submit
-
Select Schedule Setup
-
Put at check in the box for Schedule this Teacher
-
Submit
-
Select the Information
-
Scroll to the bottom and select ND State Reporting Information
-
Enter Teacher License #
-
Submit
If you want a list of Staff IDs
-
From the Start Page
-
Select the Staff Tab
-
In the search box enter a /
-
Enter
-
Select Functions on the right
-
Select List Staff Members
-
In column 1, enter LastFirst
-
In column 2, enter ID
-
Submit
Check Your Mailing Street Information
We encourage everyone to look at the Mailing Street information you have entered for your students and, if needed, clean up the data. You can easily do this by selecting a school, then System Reports, Custom Reports, Misc., and Field Verification Report. In the Field name, select MAILING_STREET from the pull-down menu, select all students, and then take the check mark out of Pause.
Now that you have all your MAILING STREET addresses, make necessary changes. Make sure members of the same family have identical mailing addresses. With the exception of the hyphen in the ZIP+4 Code, punctuation may be omitted in the delivery address block. Eliminate the use of periods and comma’s in the mailing address line.
A standardized address is one that is fully spelled out, abbreviated by using the Postal Service standard abbreviations. Uppercase letters are preferred on all lines of the address block.
MR WALTER W WITHERSPOON JR
102 MAIN ST APT 101
SPRINGFIELD VA 22162-1010
Secondary address unit designators, such as APARTMENT or SUITE, are required to be printed on the mail piece for address locations containing secondary unit designators. The preferred location is at the end of the Delivery Address Line. The pound sign (#) should not be used as a secondary unit designator if the correct designation, such as APT or STE, is known. If the pound sign (#) is used, there must be a space between the pound sign and the secondary number.
Common Designators are: APARTMENT=APT, BUILDING=BLDG, FLOOR=FL, SUITE=STE, UNIT=UNIT, ROOM=RM, and DEPARTMENT=DEPT.
102 MAIN ST APT 101
1356 EXECUTIVE DR STE 202
1600 CENTRAL PL BLDG 14
55 SYLVAN BLVD RM 108
425 FLOWER BLVD # 72
The postal service has a publication that can be helpful when you have questions on Postal Addressing Standards. Go to https://pe.usps.com/cpim/ftp/pubs/pub28/pub28.pdf.
Thank you for keeping your data clean!
Entering historical grades that need to be recorded during the second semester.
When using “Single New Entry” to enter historical grades, for NDCDE classes, Online classes, etc., remember the calendar year is 2023, but you are still in the 22-23 school year. Therefore, if you record a historical grade during the second semester of this school year, the school year you enter is 2022.
Using Single New Entry
- From the Start page select the student.
- Select Historical Grades.
- Select Single New Entry.
- Enter the name of the granting institution.
- Enter 2018 for the school year.
- Enter the Store Code.
- Enter the grade level for the student.
- Enter the grade, GPA points, Percent (if you have one), Earned and Potential credit, and Credit Type (if you use Grad Plans).
- Enter the State Course Code for the credit (can be found on the DPI website).
Field Verification Reports
There are numerous fields you can use from the field pull-down menu. Do all students have a city, zip, DOB, StudentwebID, password, etc.? The Field Verification Report is a quick way to check and correct data.
Remember, to get to the report, select a school, then System Reports, Custom Reports, Misc., and Field Verification Report. In the Field name, select the field you want to verify from the pull-down menu, select all students, and then take the check mark out of Pause.
Graduation Early
Some schools may have a student graduating at the end of their Junior year. If you have a Junior student who is graduating at the end of this school year, some adjustments need to be made in PowerSchool. For this student’s information to flow neatly into STARS and eTranscript, grades first need to be stored for semester one. Then the following day, after the nightly process, go to eTranscript and certify the transcript. Now you will need to create a senior year enrollment for the student in PowerSchool.
What you will do is to create a New School Enrollment for the student. This can be done by:
-
On the Start page, find and select the student.
-
Select Functions.
-
Select Create New School Enrollment.
-
Put in an Exit date for the last day as an 11th Grader (End of S1).
-
Exit code of 6 (Continued).
-
Entry date is same as the Exit date you used above.
-
Make sure there is a Full-Time Equivalency selected.
-
Change the Grade Level to 12.
-
Make sure District of Residence is correct.
-
Enter a comment if you wish, to indicate early graduation.
Lock Reporting Terms
A report that we like to run at our Clean Data is Good Data workshops is the Gradebook vs Stored Grades report. This report shows students whose stored grade for a course is not the same as the grade in the gradebook, when grades were last changed in the gradebook, and when the grades were stored.
To run this report:
- Select a term where grades were stored from last year (Ex. Semester One, 2017-2018)
- Select System Reports
- Select Custom Reports
- Select Grading Tab
- Select Gradebook vs Stored Grades
- What are the results?
- Whether you had a lot of differences or not, it is Best Practice to Lock Reporting Terms!
The end of the Quarter One is approaching. Time flies when you’re having fun! One of the exciting new features with version 12 is the ability to lock reporting terms which will prohibit teachers from changing grades in past reporting terms after grades have been stored. If this is set on the admin portal, it should prevent those discrepancies between stored grades and grades in the teachers’ gradebooks.
If you would like help with this process, please submit a Help Desk ticket.
New Features in PowerTeacher Pro 19.4
Viewing or Modifying Grades for Dropped Students
-
Select the class the student was enrolled
-
Select the Grading A+ tab and select Traditional under Grades
-
Select the Gear Icon and select Show Dropped Students
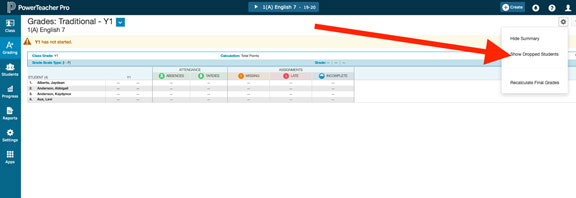
-
Enter grades for the dropped student
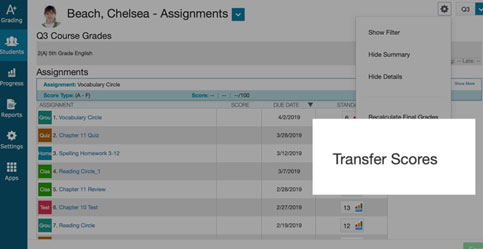
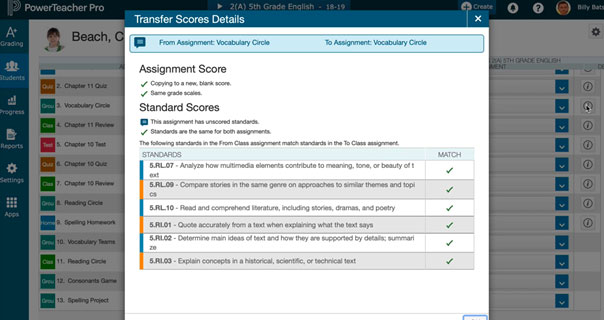
Transfer Student Assignment Scores to a Different Class
It’s now possible to transfer scores from one section to another section for a student that moves during the term.
-
Select the Students tab and select the new student that has transferred to the section
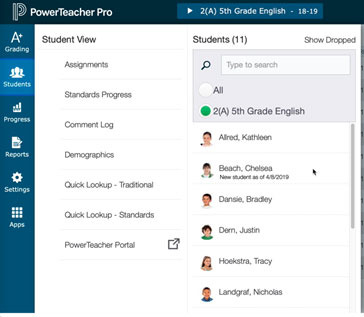
-
Select Transfer Scores from the gear icon in the upper right
-
In the From Class section select the class the student left
-
In the To Class section select the class the student is now enrolled
-
The assignments from each class will show below
-
If assignments are shared between classes, the system will automatically map them
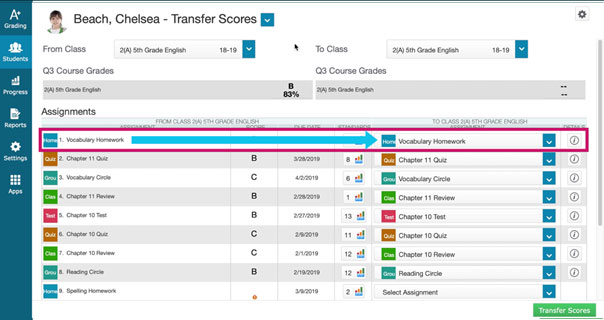
-
For any remaining assignments that do not map, you can select an assignment from the dropdown that is similar
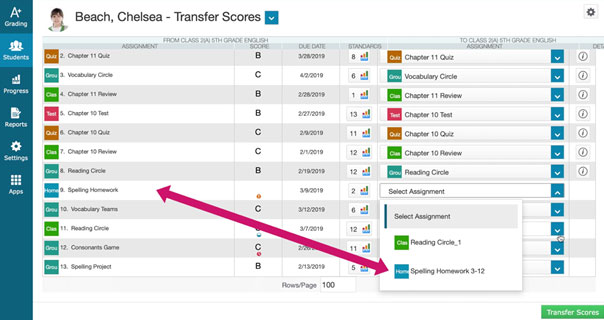
-
Select the details icon to see significant differences between two sections
-
Once done mapping, select Transfer Scores
**Assignment scores, standard scores, assignment comments and assignment flags are saved. Comments from the From Class teacher will appear with the teacher’s name at the end of the comment.
North Dakota Civics Requirements for Graduation
The state doesn’t require that you enter a test grade, only the Date Passed needs to be entered in PowerSchool.
To enter the date for a single student
-
In the left-hand column, Select the State/Province- ND link.
-
Select the Fall/Spring Submission Tab.
-
Enter the date in the Date Civics Test Passed field.
-
(You may enter that date any time as it will stay with the student from whichever grade level they passed it in.)
-
Submit.
To enter the date for multiple students
-
Select students.
-
Select Student Field Value from the Group Functions Menu (bottom right).
-
Field to Change (Fields) enter: S_ND_STU_X.CivicsTestDate
-
New Field Value, enter the date students passed the test.
-
Submit.
How to document exempt students
-
In the left-hand column Select the State/Province- ND link.
-
Select the Fall/Spring Submission Tab.
-
Enter the date 1/1/1900 in the Date Civics Test Passed field.
-
Submit.
The next day, go to eTranscript and import those updated student’s records using the Import Student Record option on the eTranscript home page. This is, of course, dependent on your district having vertical reporting of Pupil Data turned on and reporting each day.
To search for the students who have passed the civics test, and have a date entered, use the following field to search: S_ND_STU_X.CivicsTestDate
You could do this three different ways
-
in the search box enter S_ND_STU_X.CivicsTestDate>08/15/2018 (or any other date of your choice)
-
in the search box enter S_ND_STU_X.CivicsTestDate#
-
select all students – use the pull-down menu in the bottom right-hand corner to select List Students – in the first box enter lastfirst to get the student’s name – in the second box enter S_ND_STU_X.CivicsTestDate – Submit
Resetting Class Counts
A common problem this time of year is enrollment totals in a teacher’s schedule show “0” or an incorrect number. Your students are more than likely still there, you just need to reset class counts.
Resolution
To fix this issue:
-
Select the school
-
Then system (under Setup)
-
Next, select special operations (under Data Management)
-
In the drop down choose reset class counts
-
Submit
Repeat this for each school that needs it. It may take the nightly process for this to show after you run the reset class counts function.
Section Readiness Report
An issue for some that have stored grades, was the need to restore grades because a teacher hadn’t entered grades. This can be prevented by running the Section Readiness Report.
The first step is to have Administration require teachers, at the end of the grading term, to declare their grades are complete. The teacher does this in PowerTeacher Pro by selecting the Grading Tab in the left column, selecting Traditional, selecting Final Grade Status, checking the box for QX Final Grades are Complete, then selecting Save.
Prior to storing grades, the administrator or admin assistant will run the Section Readiness Report. On the admin side of PowerSchool, select the correct School and Term. Select PSCB Custom Reports on the left. Then select Grading. Select Gradebook-Section Readiness Verification. Select Verification Status, Grade Reporting Term, Teacher and Course and Submit
You have now identified teachers who have, or have not, finalized their grades.
Storm Days
To make changes in PowerSchool:
-
Select the school
-
Under Setup, select School
-
Under Calendaring, select Calendar Setup
-
Select the month to edit
-
Find the day that needs to be corrected
If the day went from an In Session Day to a Storm Day
-
Set the following drop downs to blank for Cycle Day, Bell Schedule, and Type.
-
Uncheck the School in-Session and Tracks In-Session boxes.
-
Enter a 0 for Membership Value. This day should now look like a Saturday or Sunday.
-
From the Type drop-down, select Storm Day.
-
Scroll down and Submit.
If the day was shortened by a late start or early out
-
Instructional Minutes Override should be corrected.
-
Each school has default minutes displayed. If you met fewer minutes than the default, enter in the minutes met in the Instructional Minutes Override box.
-
Scroll down and Submit.
If the day went from an In Session Day to a virtual learning day
-
In the Type drop down, select Virtual Instruction Due to Emergency.
-
Scroll down and Submit.
-
Log into STARS and adjust calendar as needed for the virtual learning day or within STARS turn on the vertical reporting for the calendar and the changes will upload into your STARS calendar during the nightly process.
If the day needs to be changed from a NOT In Session Day to an In Session Day within the current years and terms.
-
Set the following drop downs for Cycle Day, Bell Schedule, and Type.
-
Check the School in-Session and Tracks In-Session boxes.
-
Enter a 1 for Membership Value. This day should now look like a regular school day.
-
Scroll down and Submit.
If a day needs to be added to the school's current calendar & years and terms. Contact the Help Desk by submitting a ServiceNow ticket.
Manage Profile
To make searching for fields easier, use Smart Search
-
When you log into PowerSchool click on your Initials in the upper right
-
Choose Manage Profile
-
Make selections desired such as Page to Display when signing in, Quick Search alphabet, etc
-
Submit
Viewing Student Accommodations
During the year, school districts have team meetings to discuss accommodations for individual students. You can make these accommodations visible to that student’s teacher in PowerSchool.
-
Select the student in PowerSchool
-
Under Information, select Other Information
-
In the Other Alert Text box, enter a brief description of the student’s accommodations
-
Submit
The accommodations are now available to be viewed by the student’s teacher.
-
Teacher logins into PowerTeacher
-
Selects the backpack
-
Selects the student
-
Select the Yellow Alert Triangle (top left-side)
The teacher can now review the student’s accommodations.
What is Our District Code for the Mobile App?
As the start of school approaches, students and parents want to install the mobile app on their phone. A common question that is asked is, “What is our district code for the mobile app?”
When using the mobile app for Parents, do not use the district code. Instead follow the steps below:
Setup for PowerSchool mobile app for IOS devices and Android Devices
-
Download or update the current PowerSchoolmobile app from the app store or Googleplay
-
After the app is downloaded start the PowerSchoolmobile app
-
On the splash screen touch the Help link
-
Touch Search for your District
-
Fill in the PowerSchoolserver Address districtname.ps.state.nd.us
-
Submit
-
On the login page input your username and password and touch the sign in button
Finding District Code for the Mobile App
At the start of the school year, students and parents want to install the mobile app on their phone. A common question that is asked is, “What is our district code for the mobile app?”
In the past there wasn’t a district code. It is now possible to provide that code to parents.
Switch to the District Office
-
From the start page select District on the left
-
Select Mobile Registration under Plugins
-
The district code is at the top.
-
Give to parents
Wait to Turn on Vertical Reporting
With the start of school only a few days away, schools may be thinking it is time to turn on vertical reporting. Remember, it is Best Practice to wait 1-2 weeks after the start of school to turn on vertical reporting. This allows students who transfer out of North Dakota school districts and enroll in other North Dakota districts, to be handled correctly in PowerSchool so as not to create errors in STARS.
Transfer from District Level School
A District Level School (e.g. home-based) student has decided to attend High School or Elementary School as a full or part-time student, or vice versa. What do I do?
This is a three-step process:
-
Transfer Out of School
-
Transfer to Another School
-
Re-enroll in School
Start page of the student’s current school
Select the student
Functions under Enrollment
Transfer Out of School
-
Enter the day after the students last day of school at the current school (During summer, use 1st day of new school year)
-
Exit code: Transfer in District
-
Submit
-
Functions under Enrollment
Transfer to another School
-
Select the school the student will be enrolled in (destination school)
-
Submit
-
Start page of destination school
-
Search for student using a slash, ex. /lastname
-
Functions under Enrollment
Re-Enroll in School
-
Use same date as exit date
-
Entry code: Resident (or appropriate entry code)
-
Enter a comment
-
Full-Time Equivalency
-
District of Residence
-
Submit
If the transfer occurs during the summer, you will need to make the student active
-
Start page of destination school
-
Search for student using slash, ex. /lastname
-
Select student by hand and Update Selection
-
Select arrow next to Select Function button and choose Student Field Value
-
Field to Change: Enroll_Status
-
New Field Value: 0 (active)
-
Submit